Whirlpool Ice Maker W10190966 Replacement Guide
If your Whirlpool freezer stopped producing ice, the fix is often as direct as a whirlpool ice maker w10190966 replacement—but only when you match the part to your exact refrigerator. A wrong unit won’t seat, won’t connect, or won’t control the mold correctly. Use this guide to identify the correct replacement, swap it safely, and confirm water, freezing, and harvest are working again.
For more help, see our How to Replace and Install a Whirlpool Ice Maker guide.
Identify the Right Replacement
Confirm your current ice maker model
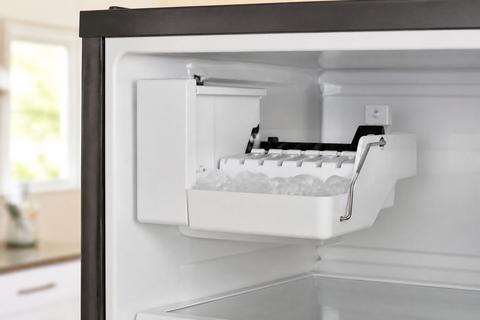
Start by locating the refrigerator’s model tag (usually inside the fresh food compartment frame or on a side wall). Note the full model number and then find the ice maker part number printed on the ice maker itself—look for something like W10190966 on a label or molded housing. If the ice maker label is unreadable, photograph the wiring connector and mounting area so you can match the connector style and screw pattern. If your unit has an “arm”/feeler paddle, also note whether it flips up/down freely; control and mechanical differences are tied to the exact module design.
Match compatible Whirlpool part numbers
Use the ice maker label as your primary match, then compare it to known compatible/superseded numbers. For example, W10873791 may be listed as an updated or compatible replacement for W10190966 in many Whirlpool systems, but compatibility depends on your refrigerator model and the module’s mounting and connector design. When checking listings, match both: (1) the ice maker part number and (2) the refrigerator model number. Also verify any revision notes (sometimes a newer number changes the harness, mounting, or fill behavior).
Check refrigerator model and mounting style
Before ordering, inspect how the ice maker mounts and connects. Look for:
- The exact screw locations and spacing on the mounting bracket or frame.
- Whether the unit uses a specific fill tube connection (thin tube to the mold) versus a different inlet arrangement.
- The wiring connector shape and whether it’s keyed (one-way fit).
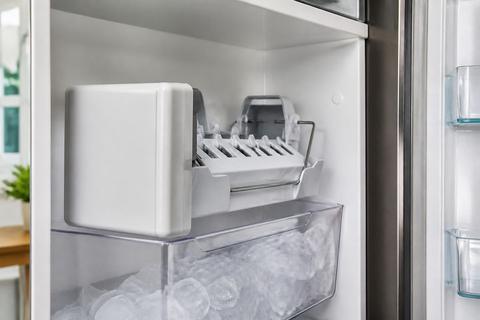
Inline and modular styles are common on Whirlpool refrigerators, and they do not always swap directly. Matching the mounting style prevents forcing misaligned parts and avoids water leaks at the inlet.
Remove the Old Ice Maker
Shut off power and water safely
Turn off power first. Unplug the refrigerator or switch the breaker to the refrigerator off to prevent electrical shorts while handling the harness. Then shut off the water supply to the refrigerator at the saddle valve or water shutoff handle. Dispense any remaining water pressure by using the dispenser until it stops running, and keep a towel ready where you’ll work around the water connection and fill tube.
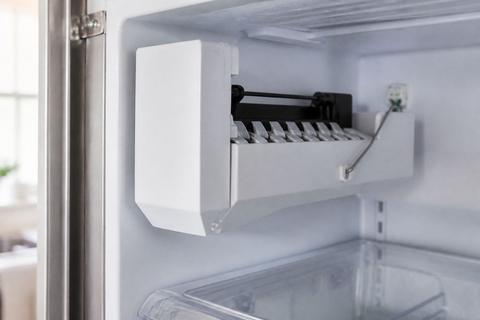
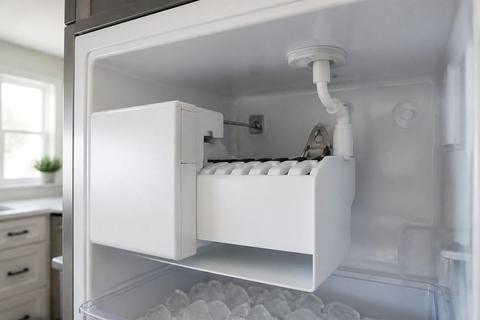
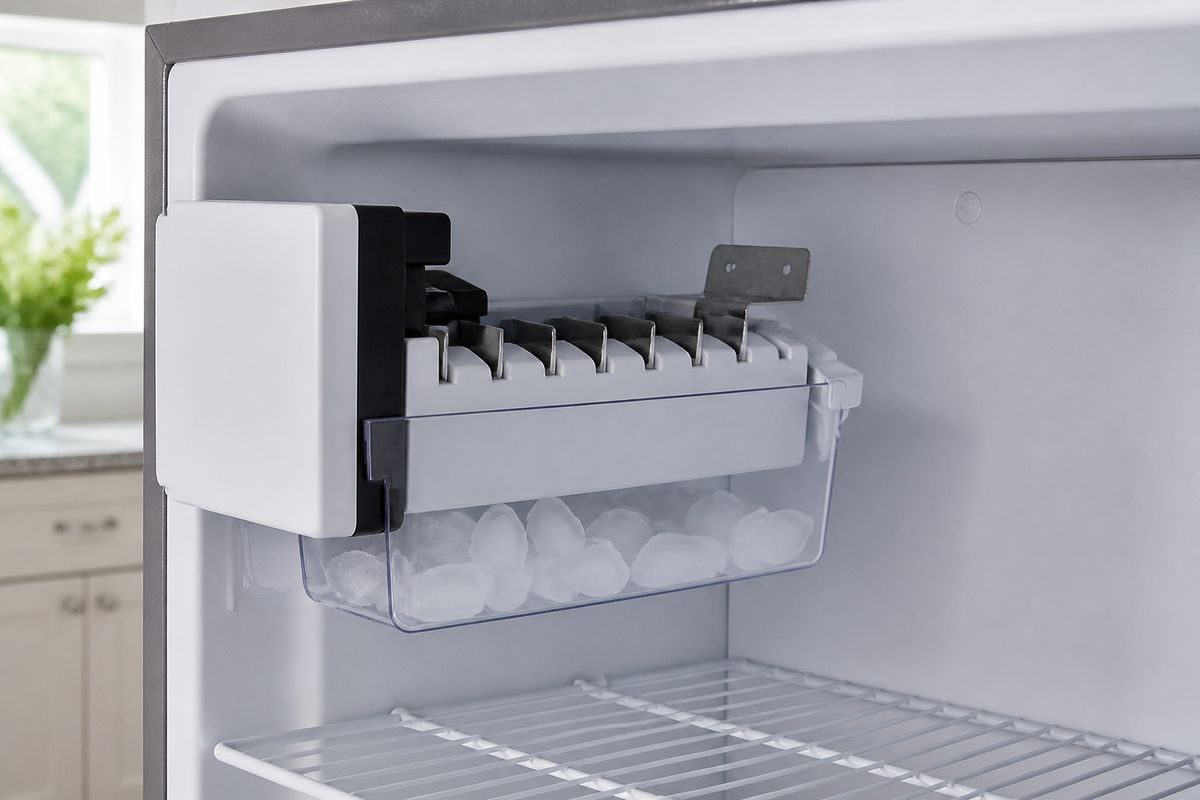
Remove the cover, harness, and mounting screws
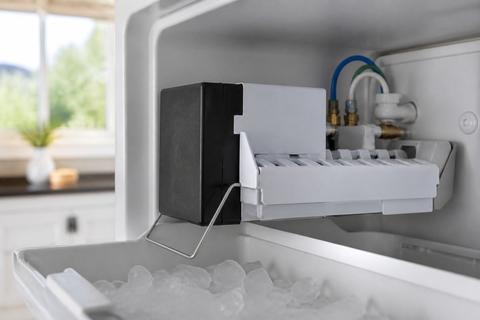
Open the freezer to access the ice maker area. Remove the ice maker cover/shroud if your model has one, and set screws aside in a cup or on a magnetic mat. Disconnect the wiring harness from the ice maker connector by pressing the release tab (don’t pull on wires). Remove the mounting screws that hold the ice maker to the bracket/module. Lift the ice maker out carefully—avoid bending the fill tube or stressing the harness.
Inspect the fill tube and connector for damage
With the ice maker removed, inspect the fill tube (the thin tube that feeds water into the ice mold) for cracks, kinks, or heavy frost buildup. Check the connector area where the inlet meets the ice maker for looseness or mineral residue. If you find a frozen fill tube, plan to thaw it before installing the new unit; frost can block water flow even with a brand-new ice maker. Also inspect the connector pins on the harness for bent contacts or moisture.
Install the New Ice Maker
Position the replacement unit correctly
Place the new ice maker into the mounting opening, aligning the screw holes with the bracket points. Ensure the fill tube sits correctly in its pathway and does not pinch or bend. Align any “keyed” guides so the module sits flush—forcing alignment can distort the housing and create gaps that cause leaks or harvest problems. Once positioned, insert the mounting screws and tighten them securely, but do not overtighten into plastic.
Reconnect the wiring and secure the assembly
Reconnect the harness to the ice maker connector until it clicks or seats fully. Route the wire the same way the old harness sat, so it doesn’t rub on metal edges or get trapped by the cover. If your model uses a retaining clip or strain relief, reinstall it in the same orientation. After the wiring is connected and the unit is mounted, reinstall any parts that hold the harness and stabilize the module.
Reinstall the cover and any retaining parts
Put the cover/shroud back on exactly as it came off. Reinstall any retaining brackets, clips, or screws that secure the ice maker housing and protect the connector area. If your model has a sliding or pivoting feeler arm, make sure the arm moves freely and is not blocked by the cover. Finally, restore power by plugging the refrigerator in (or switching the breaker back on) and open the water supply.
If Your Part Number Differs
Compare W10190966 with W10873791 and related versions
When listings show different numbers, treat it as an update mapping—not a guaranteed fit. W10873791 may be used as a compatible replacement for W10190966 in many Whirlpool refrigerators, but you must verify using your refrigerator model number and mounting/connector design. Compare the seller’s “fits model” list, and cross-check whether the replacement uses the same harness type and the same style of water inlet connection. If the connector shape differs, the part is not the right match even if the form looks similar.
Understand common superseded and alternate part numbers
Whirlpool parts listings can include:
- Superseded replacements (older number replaced by newer one).
- Alternate numbers for different revisions of the same refrigerator model.
- Kits that add extra hardware (sometimes a bracket, harness, or mounting adapter).
Use the ice maker label from your current unit and then check whether the new number is explicitly marked as a replacement for that exact part. Avoid ordering based only on “same shape” descriptions—Whirlpool revisions can change electrical control behavior and water routing.
Use the model tag to verify a true fit
Your refrigerator model tag is the decisive factor. Match your refrigerator model number to the ice maker’s compatibility list provided by the parts seller or manufacturer. Also confirm the mounting style visible on your unit: screw pattern, bracket geometry, and connector keying. If you can’t find an exact match, use both numbers (the ice maker part number and the refrigerator model number) to narrow down the correct revision. This prevents buying a unit that physically fits but fails to harvest or fill properly.
Test and Troubleshoot After Installation
Run a full ice-making cycle
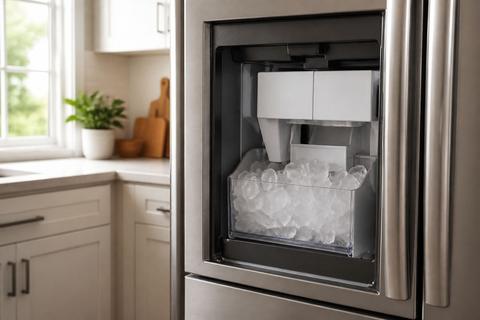
After installation, allow time for the refrigerator to reach correct freezer temperature and for the new ice maker to complete its harvest. Keep the freezer around 0–5°F for proper freezing and ice cube formation. Then trigger normal operation by leaving the ice maker enabled (for many Whirlpool models, the ice maker shutoff arm must be in the down/ON position). Whirlpool recommends discarding the first 2–3 full batches of ice after installation or after replacing the water filter, since initial cubes can be small, hollow, or off-tasting.
Check water fill, freezing, and eject function
Observe the unit during operation:
- Water fill: listen for the fill sound and confirm water reaches the mold area instead of stopping early.
- Freezing: allow at least one full cycle time once water fill is confirmed; ice should form solidly.
- Eject/harvest: verify the mold rotates and cubes release into the bin.
If water fill is weak or absent, inspect the frozen fill tube first and check that the water supply is fully open. If water fills but ice never ejects, check freezer temperature and whether the shutoff arm is blocking harvest.
Fix common issues like no ice, leaks, or noise
Use targeted checks:
- No ice / partial ice: a blocked fill tube is the most common cause—thaw any frozen section using a hair dryer on low with towels nearby, then restart operation.
- Leaks: recheck the inlet connection and ensure the fill tube is not cracked or kinked; reseat if loose.
- Noise: scraping or repeated buzzing can indicate a jam in the mold/harvest path; clear obstructions and ensure the ice maker arm moves freely.
- Slow ice / small cubes: replace an overdue water filter—Whirlpool EveryDrop filters are rated about 6 months / 200 gallons—and confirm water pressure is roughly 35–120 psi at the supply line.
After clearing a jam or replacing parts, give the ice maker about 24 hours to return to normal production.
When to Replace Other Ice Maker Variants
Know when a direct swap is not enough
Not every Whirlpool ice maker variant is a true direct swap. If your old unit uses a different harness connector, a different mounting bracket style, or a different fill-tube arrangement, you may need a specific kit version rather than the “closest” replacement. Pay special attention if your refrigerator has an inline ice maker assembly versus a modular system—these often differ in how harvest is controlled and how water feeds the mold. If the replacement doesn’t seat flush or the cover won’t reinstall without pinching wires, stop and match the correct revision.
Spot signs of control failure versus mechanical failure
Before replacing additional parts, determine what failed:
- Control/electrical issues: the unit may have power and water available but never completes harvest, or it won’t respond after installation. Look for an arm position that blocks ON, and ensure connectors are fully seated.
- Mechanical issues: frequent jamming, grinding sounds, or ice accumulation in the mold or chute indicates a mechanical obstruction or a mold/harvest problem.
If the fill tube is frozen or water never reaches the mold, treat it as a water-path issue first; replacing the module won’t fix a blocked inlet. If harvest fails after water fill works, focus on the harvesting path and ice maker operation.
Choose a compatible replacement with confidence
Select replacements by matching the ice maker part number and the refrigerator model tag, not by appearance alone. Confirm the mounting screw pattern and connector type match your existing unit. If a listing shows multiple versions for your model, choose the one that explicitly states it fits your current ice maker part number or your exact refrigerator revision. For the smoothest outcome, also confirm any additional components included in the kit align with your installation (mounting adapters, harness changes, or updated brackets).
Frequently Asked Questions
Is W10873791 a replacement for W10190966?
In many Whirlpool refrigerators, W10873791 may be used as a compatible replacement or update for W10190966, but fit must be confirmed by the refrigerator model number and mounting style before purchase. The part number alone doesn’t guarantee interchangeability if your refrigerator uses a different mounting bracket revision or connector type. Check that the replacement listing specifically notes compatibility with your exact refrigerator model and that the connector/harness style matches your current ice maker.
How do I know which Whirlpool ice maker part I need?
Use three identifiers: the refrigerator model number, the old ice maker part number, and the connector/mounting design. Matching only the visible ice maker shape is not enough because Whirlpool revisions can change harness pinouts, bracket geometry, and water inlet routing. Start with the label on the ice maker module (look for W10190966 or other W-numbers), then verify the replacement that the parts listing says fits your refrigerator model tag.
Can I replace the ice maker myself?
Often yes. Many Whirlpool ice makers can be swapped with basic tools if you disconnect power, shut off water, and follow the correct part-specific installation steps. The key is safe handling: unplug the refrigerator or turn off the breaker, shut off the water supply, and disconnect the wiring harness using the connector release tab. Follow the mounting instructions so the unit seats flush and the fill tube doesn’t kink.
Why does my new ice maker still not make ice?
Common causes include a blocked fill tube, loose wiring, no water supply, incorrect freezer temperature, or a need to reset the unit after installation. A frozen fill tube is one of the most frequent reasons for no ice even after installing a new ice maker—thaw it and confirm water flow into the mold area. Also verify the ice maker shutoff arm is in the ON position and the freezer is cold enough (around 0–5°F).
Do all Whirlpool ice maker part numbers fit the same refrigerators?
No. Some numbers are direct replacements, while others are only compatible with certain models or revisions. Always verify by refrigerator model and part compatibility, and check the mounting style and connector design match your current unit. If the replacement has a different harness connector shape or the mounting doesn’t line up without forcing, it’s not the correct part for your refrigerator configuration.