How to Replace a Whirlpool Ice Maker: Install Guide
When your Whirlpool ice maker stops producing ice, you want it fixed fast—without guessing at the parts or the wiring. This is the practical how to replace whirlpool ice maker walkthrough you can follow step by step, from identifying the correct assembly to getting fresh cubes flowing again. If you’ve already ordered a replacement, you’re in the right place.
For more help, see our How to Replace and Install a Whirlpool Ice Maker guide.
Before You Start: Confirm the Model and Parts
Identify your Whirlpool refrigerator or freezer model
Start by locating the refrigerator data plate (usually inside the fresh-food compartment wall or along the side wall near the temperature controls). Write down the full model number (for example, “WRF…”) and the serial number. Then match that model number to Whirlpool’s ice maker parts list so you get the exact ice maker assembly for your refrigerator or freezer (inline icemakers vs. modular/freezer-door styles use different harnesses and water feed connections).
Before you open the package, check the box label for compatibility with your specific model. If you’re replacing an ice maker in a freezer-only unit, confirm whether your unit uses a dedicated freezer ice maker module or a larger refrigerator-mounted system.
Check whether you need a full ice maker assembly or a repair kit
Not every “no ice” problem requires replacing the entire ice maker. If your unit’s housing, motor, or control module is damaged, replacing the full assembly is the safest choice because internal components are typically not serviced separately.
If the ice maker is intact and only a small mechanical part is failing—like a lever/feel arm, a sensor, or a minor mechanical linkage—an OEM Whirlpool repair kit can be more cost-effective. Before ordering, verify what symptom you have (no fill, slow harvest, jams, intermittent freezing) and compare it to the replacement part’s intended repair.
Gather the right tools, screws, and water line parts
Have everything ready so you don’t leave the unit disconnected longer than necessary. Typical tools include a Phillips screwdriver (or nut driver set), a flat-head screwdriver for clips, a socket/ratchet for mounting hardware (if used), and towels to catch residual water.
For water connections, ensure you have the correct water line parts specified for your model: the ice maker water fill tube, any quick-connect fittings, and a new water inlet line if the old one is brittle, cracked, or kinked. Also keep food-safe towels or a small bin to protect shelves and to prevent water from dripping onto wiring.
Safety and Preparation Steps
Turn off power and shut off the water supply
Unplug the refrigerator (or switch it off at the breaker) before touching the ice maker wiring harness. Then shut off the water supply feeding the refrigerator—use the saddle valve/house shutoff behind the fridge if available, or shut off at the main water valve if you don’t have a dedicated stop valve.
Disconnecting power and water prevents electrical shock and avoids a mess when you release the fill tube. Once shut off, leave the doors closed briefly so temperatures stabilize as you work, and keep a towel ready where the water line and drain parts will disconnect.
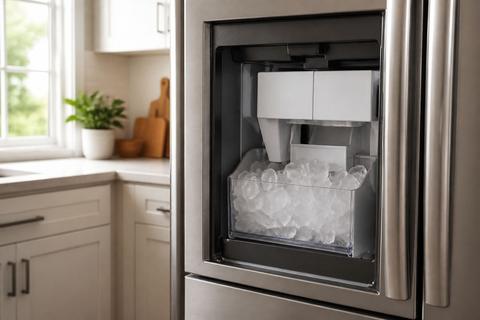
Empty the freezer and protect shelves from spills
Move frozen food into a cooler or another freezer so the shelves aren’t sitting under water while you replace the ice maker. Remove ice bin(s) and place towels on the bottom of the freezer compartment to catch drips.
If your model has adjustable shelves, pull them carefully and set them aside so you can access screws and wiring without straining cables. Protect any surrounding plastic from scratches with a soft cloth, especially if you’re working near the ice maker module or the fill tube route.
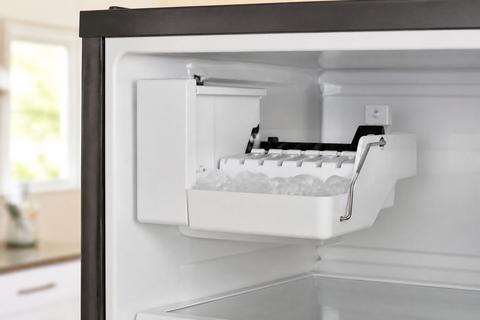
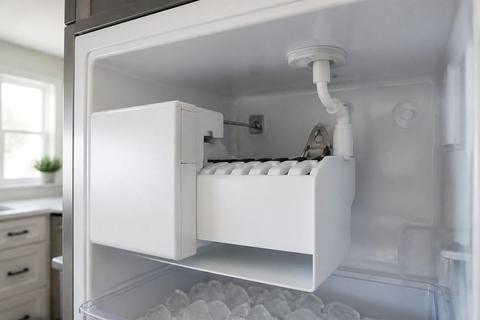
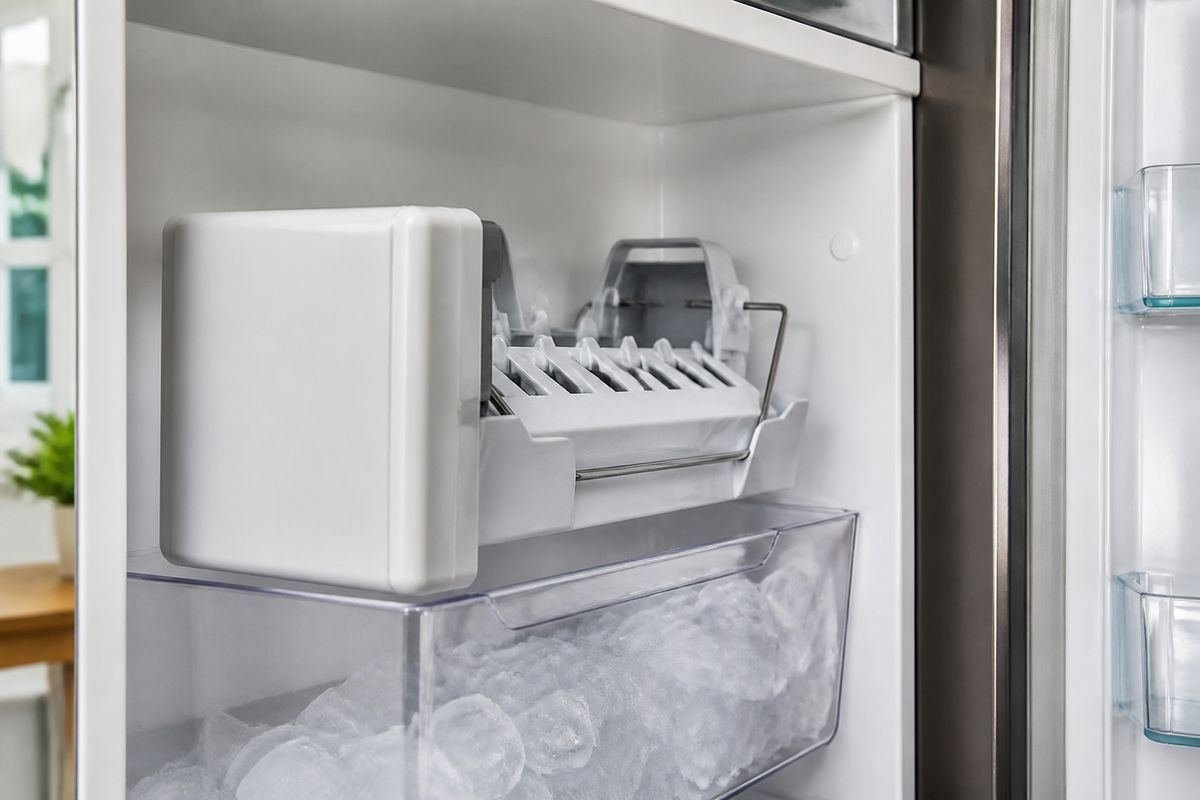
Locate the ice maker, water line, and drain components
Before removing anything, identify the three connection areas: (1) the ice maker module or assembly mount points, (2) the water fill line (the thin tube feeding the ice mold), and (3) any drain plug/tube components near the base of the ice maker area.
Take a quick photo with your phone before disconnecting wiring and tubes so you can match connector orientation later. If your model has a wire harness clipped to the wall, locate the clip points so you can release them without yanking on the wires.
Remove the Old Ice Maker
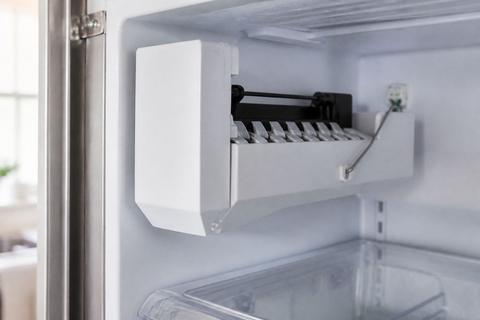
Disconnect the wiring harness and mounting screws
Locate the ice maker’s wiring harness connector and press the release tab to disconnect it. Do not pull on the wires—grip the connector body.
Next, remove the mounting screws that hold the ice maker to the freezer wall or bracket. Keep track of screw length and orientation; some brackets use different lengths. Once the screws are out, gently free the assembly from the mounting location, guiding the wiring so the harness doesn’t snag.
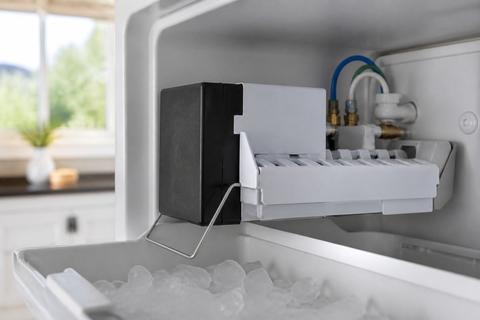
Release the water fill tube and ice maker line
Find the ice maker water fill tube connection. If your model uses a quick-connect fitting, press the release collar and pull the tube straight out—avoid twisting the tube to prevent cracking.
If the connection uses a clamp or retaining clip, loosen it with the correct screwdriver and then slide the tube out of its fitting. Inspect the tube end as you remove it: if it’s brittle, cloudy, or kinked, replace that segment during installation rather than trying to reuse compromised tubing.
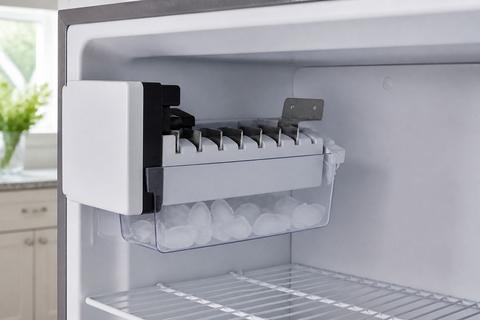
Inspect the drain plug, drain tube, and surrounding area
Look for debris, ice buildup, or residue around the drain plug/tube connection area. A clogged drain can cause poor harvest or water management problems even if the ice maker mechanically operates.
Remove visible ice carefully with a plastic tool (avoid metal scraping that can gouge plastic). Check the drain tube path for kinks or restrictions and confirm the drain plug seats properly later. If you see moldy residue or heavy mineral deposits, clean the area with a damp cloth and allow it to dry fully before reassembly.
Install the New Whirlpool Ice Maker
Position the new assembly and secure it in place
Set the new Whirlpool ice maker assembly into the mounting location so the feed tube and wiring route align naturally with the original path. Ensure the mounting holes line up with the screw points before tightening.
Install the mounting screws snugly—do not overtighten, especially if screws thread into plastic. If your model uses a bracket or alignment tabs, confirm the tabs seat fully so the unit sits level and the ice level sensor (if present) can move without binding.
Reconnect the wiring, water line, and fill tube
Reconnect the wiring harness until the connector clicks or seats securely. Route the harness along the original clip points so it won’t contact moving parts or rub against sharp edges.
Reattach the water fill tube: press the tube into the fitting until it seats and locks in place (or reinstall the clamp/clip if your model uses one). Confirm the tube isn’t kinked and has a smooth bend radius from the water connection to the ice maker inlet.
Verify alignment of the ice level sensor and moving parts
For many Whirlpool ice maker designs, the ice level system relies on correct alignment of the sensor/feel mechanism and clearance for the mold’s moving components. Check that the ice level arm/sensor is positioned without rubbing or sticking.
On many Whirlpool refrigerators with a wire feeler/shutoff arm (or sliding feeler paddle on inline icemakers), verify the arm position: lifting it to the up position turns the ice maker OFF, lowering it turns the ice maker ON. Move the feeler through its range by hand only if your model allows it, and ensure nothing binds against the housing.
Test, Reset, and Troubleshoot
Restore power and run a quick ice-making test
Turn power back on (plug in the refrigerator or reset the breaker). Then allow the ice maker to cycle and harvest. After installation, Whirlpool recommends discarding the first 2–3 full batches of ice because the initial cubes can be small, hollow, or off-tasting.
Give the ice maker time based on operating cycle: once water and freezer temperature are correct (about 0–5°F), many models produce a harvest roughly every 90 minutes to 2 hours. After the first harvest attempt, confirm the ice mold fills and the unit completes a full cycle.
Check for leaks, loud motor noise, or no-fill issues
As the unit begins to fill, watch for water leaks at the water connection fitting and along the fill tube route. If you see moisture pooling, power off immediately and reseat the connection.
No-fill issues often trace to a closed water valve, a loose wiring connection, an unseated water line, or a frozen fill tube (the thin tube that feeds water into the ice mold). A frozen fill tube blocks flow—thaw it with a hair dryer on low (keep it off plastic too long) and then restart the unit.
Loud grinding or constant motor noise can indicate a jam or binding from misalignment or blocked moving parts. If the unit stalls, shut it off and check the ice path and moving mechanism clearances.
Use the manual or diagram to troubleshoot common failures
When troubleshooting, follow the wiring and sensor logic shown in your Whirlpool parts diagram or manual for your exact model number. Use symptom-to-cause mapping:
- If the unit fills partially or slowly, confirm your water filter status (a clogged filter and low water pressure are common).
- If it never fills, check the inlet valve activation, the water valve position, and the fill tube for ice.
- If it fills but doesn’t harvest, inspect for lever/feel arm state and any jammed ice.
If you have access to modular Whirlpool ice maker test procedures, use the model’s specified test method. Many modular assemblies include T and H test holes on the front module—power off, then (with caution) using a paperclip to jump the marked holes to force a cycle can help confirm water fill vs. harvest behavior.
When a Replacement Kit or Repair Part Makes More Sense
Signs the issue is the motor, lever, or sensor instead of the full unit
Consider a repair kit when the ice maker housing and wiring connector are intact and only one functional component is failing. Clear signs include a stuck lever/feel arm, an ice level sensor that doesn’t trigger correctly, or mechanical issues limited to a small linkage rather than the whole assembly.
If the unit harvests but produces irregular cube sizes or inconsistent ice level, suspect sensor and lever mechanisms before replacing the full unit. If water supply appears normal (it fills water into the mold), yet harvesting is erratic, that points to motor/harvest-related parts rather than the water feed.
How to choose between a Whirlpool ice maker kit and a full replacement
Choose a full ice maker assembly when the control module, motor, or wiring harness shows damage, burning, broken connectors, or cracked mounting components. Replacing the complete unit reduces compatibility issues because the harness, sensor alignment, and internal hardware are designed to match your refrigerator’s exact ice maker layout.
Choose a Whirlpool repair kit when the failure is isolated to a specific replaceable part and the remainder of the assembly is in good condition. Use your model number to ensure part compatibility—mismatched kits won’t align with the correct sensor and mounting geometry, leading to persistent “no ice” or jam conditions after installation.
When to call for professional Whirlpool ice maker repair
Call a professional if you find recurring leaks after reseating the line, if the water inlet valve appears faulty, or if your drain and water management system shows corrosion or repeated blockage. Also seek help if you cannot safely access the ice maker wiring or water connections without removing walls/panels.
If diagnostic steps indicate a complex issue—like electrical faults in the control board, repeated harvest failure due to internal freezing, or water pressure problems that don’t clear—an appliance technician can confirm voltage and component behavior efficiently. This avoids repeated part swaps and prevents damage to refrigerator electronics.
Frequently Asked Questions
How do I know if I should replace the whole Whirlpool ice maker or just a part?
If the housing, motor, or control components are damaged, a full replacement is usually the safest option because these parts are tightly integrated and not reliably “mixed” without the correct sensor and harness alignment. If the issue is isolated to a lever, feel arm, sensor, or another small mechanical part, a repair kit can restore normal operation without replacing the entire assembly.
Use your symptom to guide the decision: no-fill points toward water feed/inlet components, while jammed or incomplete harvest points toward lever/sensor or harvest mechanism parts.
Do I need to turn off the water before replacing a Whirlpool ice maker?
Yes. Always shut off the water supply and unplug the refrigerator before starting to prevent leaks and electrical risk. Water connections can drip or release pressure when the fill tube is removed, and electrical power near wet connections increases safety hazards.
Shut off the refrigerator’s water valve (or the main supply if needed) before disconnecting the fill tube.
Why is my new ice maker not making ice after installation?
Common causes include a loose wiring connection, an unseated water line, a closed water valve, or a unit that still needs time to cycle and freeze. After installation, allow the freezer to reach the correct temperature range so the mold can freeze properly.
Also check the ice maker feeler/shutoff arm position: if it’s in the up/off position, the unit won’t start.
Can I install a Whirlpool freezer ice maker myself?
In many cases, yes, if you match the correct model and follow the installation steps carefully. Take your time aligning the assembly, seating the fill tube firmly, and reconnecting the wiring harness to avoid leaks and “no-fill” failures.
If your refrigerator has a more complex water or drain setup, or if you need to access internal water lines behind panels, professional help can prevent damage.
Where can I find the Whirlpool ice maker manual or diagram?
Use your refrigerator model number to look up the parts diagram and installation instructions from Whirlpool or an appliance parts retailer. The diagram helps confirm exact connector locations, mounting points, and the correct water line routing for your ice maker style.
With the diagram, you can also follow the correct troubleshooting logic for your specific symptoms and components.