GE Ice Maker Not Getting Water: Diagnose the Water Path

If your ge ice maker not getting water, you’re probably hearing it run or see the ice production stop while the refrigerator still seems to work. The key is that the ice maker has its own water path—so “no ice” often isn’t the same problem as “no water at the dispenser.” Use the steps below to pinpoint where water stops: from the wall supply to the inlet valve, through the fill tube, and into the icemaker mold.
For more help, see our Fix GE Ice Maker Water, Leak, and Clog Problems guide.
Start With the Symptom Pattern
Confirm that the freezer is cold enough to make ice
Water can’t freeze if the freezer isn’t cold enough, so confirm temperature first.
- Check your freezer setting on the control panel; set it to 0°F (or the coldest setting that displays around 0°F).
- Use a freezer thermometer if available and place it near the ice maker area for 2–4 hours.
- Look for normal ice production history: if the ice maker has been off due to a warm freezer period, water will not freeze even when water flow is correct.
GE ice makers need freezer temperatures around 0 to 5°F to cycle and freeze properly.
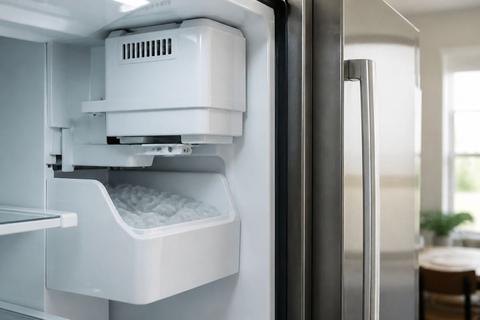
Check whether the ice maker is on, full, or jammed
An ice maker switched off, jammed, or “full” will stop the harvest cycle and prevent water from entering the mold.
- Find the ice maker’s feeler arm (wire bail) and ensure it is down (not held up by food, a container, or ice).
- If your model has a front ice maker cover, slide the ON/OFF switch to ON.
- If there’s a recessed test button near a status LED, press it to force a harvest cycle (watch for the fill sound and movement).
If the arm is stuck up or the bin is mis-seated, the icemaker will not initiate filling.
Separate water-supply problems from harvest problems
You need to know whether the issue is lack of water reaching the mold, or a harvest/motor problem after water enters.
- Watch for any fill attempt: during a harvest/test, listen for a short inlet valve sound.
- Open the freezer and look at the bottom of the ice maker area: if you see water pooling or a wet fill area but no ice, focus on freezing/harvest.
- If there is never water at the mold/fill tube during a test, focus on the water path.
This separation prevents replacing the wrong part.
Trace the Water Path From Wall to Mold
Inspect the shutoff valve and supply line
Start at the simplest causes: no water at the source or a restricted supply.
- Locate the household ice maker/water shutoff valve behind or near the refrigerator.
- Make sure the valve handle is fully open (parallel to the pipe means open on most styles).
- Check the braided or plastic supply line for kinks and ensure the line is not pinched behind the fridge.
A partially closed saddle valve or kinked line can restrict flow enough that the ice maker never fills.
Look for kinks, leaks, or a frozen water tube
A frozen tube is one of the most common reasons a GE ice maker gets no water even though the refrigerator has power.
- Carefully pull the refrigerator out enough to inspect the water line behind it.
- Look for ice buildup at bends and at the refrigerator’s water inlet area.
- If you find a frozen section, thaw it safely (do not puncture tubing). Use gentle warmth around the frozen area until water can move.
If the line is cold but the ice maker never fills during a test, freezing is the most likely cause.
Test whether water reaches the refrigerator inlet valve
Confirm that water arrives at the refrigerator before you troubleshoot internal components.
- Turn the household valve off, then disconnect at the refrigerator inlet only if you’re comfortable and safe doing so.
- With the valve on, carefully check whether water flows at the inlet connection while the valve is open.
- If no water flows at the inlet connection, the issue is upstream (shutoff valve, plumbing, or household filter).
If water reaches the inlet but not the ice maker mold, the internal water path is the problem.
Check the Refrigerator Components That Commonly Fail
Examine the inlet valve for clogging or electrical failure
The inlet valve controls whether water flows into the ice maker circuit.
- Remove access to the inlet valve (inside the rear lower panel area) per your model’s service cover location.
- During an ice maker test/harvest cycle, listen for a sharp valve click when it should fill.
- If there is no click and there’s no water at the mold, the inlet valve (or its control signal) is likely.
A clogged valve can also open imperfectly—slow drips never reach the mold in time.
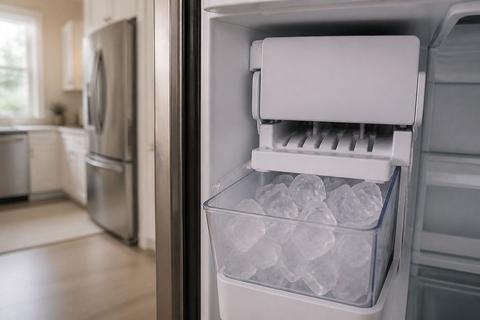
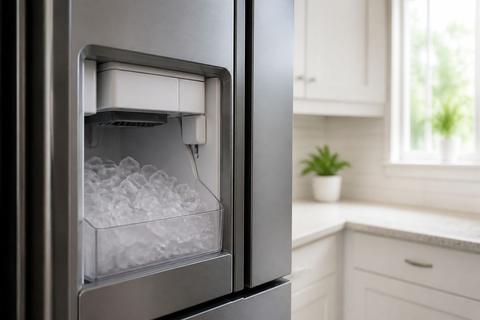
Inspect the fill tube, icemaker head, and fill cup
Even when the valve works, water can’t reach the mold if the fill route is blocked.
- Check the fill tube for ice buildup or a hard blockage.
- Look at the icemaker head area for misalignment or signs of freezing around the outlet.
- Inspect the fill cup/mold area for trapped ice that prevents new water from entering.
Clear packed ice from the fill tube so water can complete the path into the mold.
Verify the door switch and dispenser interactions
Dispenser and ice maker behavior can share control components, so confirm basic interactions.
- If your dispenser dispenses water but ice maker doesn’t, focus on the ice maker-specific branch (valve to mold, fill tube, ice maker module).
- If the dispenser is also acting wrong, check door switch behavior: with the door open, the unit should register door state normally.
- Ensure the freezer door closes fully—an interlock issue can interrupt harvest timing.
Door and dispenser-related signals can affect the timing and permission to fill.
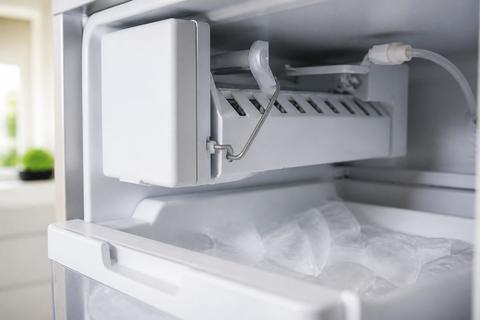
Diagnose Frost, Freeze-Ups, and Blockages
Clear ice buildup in the fill tube and icemaker mold
Ice plugs block water even when the inlet valve attempts to open.
- Unplug the refrigerator (or switch off the ice maker) before removing covers near the ice maker.
- Use warm air and time to thaw ice in the fill tube and at the mold opening—avoid sharp tools that can crack plastic.
- Remove loose ice chunks, then reassemble and restart the ice maker.
A completely cleared fill tube is required for normal fill height.
Understand why overfreezing can stop new water from entering
If the freezer runs too cold or stays colder than needed, water can freeze too quickly in the path, creating an ice obstruction.
- Set the freezer to 0°F rather than colder settings.
- Reduce conditions that create long warm-to-cold cycles (frequent door openings or overloaded shelves).
- After any thaw/clean, watch the first harvest cycle to ensure the mold receives liquid water rather than trapping it upstream.
When ice forms inside the fill tube, the next fill attempt can fail permanently until you remove the blockage.
Defrost safely without damaging plastic parts
Defrosting should be controlled—excess heat can deform plastic fittings or wiring.
- Use unplugging to remove power before working near plastic ice maker components.
- Thaw using gentle warmth (hair dryer on low distance, or warm room air) rather than direct high-heat contact.
- Stop when water begins to flow or when the blockage loosens, then remove remaining chunks.
This approach prevents cracked housings and keeps the water path intact.
Use Simple Tests to Narrow the Problem
Run a basic water-dispense check
This tells you whether the household water system is supplying water to the refrigerator.
- Dispense water at the refrigerator dispenser for 20–30 seconds.
- Check flow: it should run steadily, not just dribble.
- If the dispenser is weak or air-bubbly, the ice maker will also struggle—address filtration and supply first.
A clogged filter or air trapped in the line can starve the ice maker even when the ice maker itself is fine.
Listen for valve clicks and fill attempts
Use sound as your quickest decision tool for whether the valve is being commanded.
- Initiate a test/harvest cycle using the ice maker’s test button (or by sliding the ON switch if needed).
- Listen inside the refrigerator compartment for a click near the water inlet valve.
- At the same time, watch the ice maker area for any movement in the fill/fill-cup area.
No click plus no fill points to valve/control. Click with no water flow points to blockage or a valve that isn’t opening properly.
Use a multimeter only if you are comfortable and safe
Electrical checks can identify a failed solenoid or interrupted control circuit, but only if you can do it safely.
- Unplug the refrigerator before accessing wiring.
- If your comfort level is good, measure inlet valve coil resistance using a multimeter on the valve terminals.
- Compare readings to the specification in your model’s service manual; out-of-range indicates a failed valve.
If you cannot confidently access wiring or confirm readings, focus on mechanical checks like freezing and tube blockage first.
When the Ice Maker Works but Water Does Not
Differentiate a bad valve from a bad icemaker module
If ice maker harvest seems active but water doesn’t reach the mold, you’re likely down to two components: inlet valve vs. ice maker control/module.
- Trigger an ice maker test cycle and determine whether you hear the inlet valve click.
- If the click is absent, the module often isn’t commanding the valve—module/control or wiring is likely.
- If the click is present but the mold stays dry, the inlet valve may be electrically failing under load or clogged, or the water path is blocked.
This one decision splits the troubleshooting efficiently.
Identify cases where the refrigerator still makes water at the dispenser
Dispenser performance helps you isolate the ice maker water branch.
- If the dispenser dispenses water normally, the household supply and refrigerator water inlet are working.
- The likely culprits are the ice maker’s fill tube, the ice maker inlet valve side (if separate), or the ice maker module.
- If the dispenser is also failing, prioritize filtration/supply and inlet valve feeding the whole refrigerator first.
That pattern keeps you from replacing an ice maker when it’s actually a restricted branch.
Know when the issue is in the ice maker assembly itself
If water reaches the mold but ice never forms or harvest never completes, the problem is inside the ice maker assembly.
- Look for water present in the mold area during a test cycle.
- If water appears but ice is missing or harvest stops mid-cycle, check for an ice jam and ensure the eject arm can move freely.
- If the unit cycles poorly after clearing blockages, the ice maker module/motor control is the likely failed component.
Water-at-mold with no successful freezing/harvest points away from the water path.
Repair, Replace, or Call for Service
Decide whether cleaning, thawing, or part replacement makes sense
Choose the simplest fix that matches the failure point you found.
- If you find a frozen fill tube or ice plug, clean/thaw first—this restores function without replacing parts.
- If the inlet valve never fills and the valve is likely frozen/clogged, thaw/clear and retest before replacing the ice maker.
- If the valve clicks but water never reaches the mold, replace the inlet valve assembly rather than the icemaker module.
Replacement is worth it when the diagnosis points to a specific failed component.
Know which GE parts are most often replaced
Common replacements align with where water stops in the path.
- Water inlet valve (when it won’t open or doesn’t deliver water to the ice maker side).
- Ice maker assembly/module (when water reaches the mold but harvest fails due to motor/control faults).
- Fill tube/ice maker components (when plastic parts are blocked or broken from repeated freezing).
Many “no water to ice maker” cases are solved by clearing a frozen tube or fixing the inlet valve.
Escalate to a technician for sealed or electrical issues
Some problems are not safe or practical to resolve without professional tools and authorization.
- If you suspect sealed-system refrigeration problems or repeated freezing caused by airflow failures, call service.
- If you find damaged wiring, scorched connectors, or water intrusion into electrical housings, stop and escalate.
- If your multimeter checks point to a control board/module replacement and you lack the service manual specs, a technician will confirm correct parts and safety.
Electrical and sealed-system issues are where DIY risk rises quickly.
Frequently Asked Questions
Why is my GE ice maker not getting water but the dispenser still works?
That usually means water is getting into the refrigerator but failing on the ice maker’s branch. The most common causes are a frozen fill tube, an inlet valve solenoid that won’t open for the ice maker side, or a failed ice maker module that isn’t commanding the fill correctly. Also check for an ice jam near the mold that blocks water entry—then the valve may click, but the fill path is effectively blocked. The dispenser working narrows the issue to the ice maker water path and ice maker controls.
How do I know if the water line is frozen?
Look for signs that water isn’t reaching the mold: the ice maker makes no ice and you never see water entering the fill cup during a test cycle. Another clear clue is an ice plug or hard ice buildup in the fill tube area, often with ice accumulation near the back of the freezer where the tubing runs. If the line feels very cold but empty at the mold end and the inlet valve attempts to fill, freezing is the most likely reason. A thawed-but-recurring blockage points to an airflow/temperature issue as well.
Why does my GE ice maker stop making ice suddenly?
Sudden stops typically come from a frozen fill tube, a clogged inlet valve, a loose connection, an ice jam, or the ice maker being switched off by the feeler arm (wire bail). If the wire bail is stuck up—sometimes by a bag of food, a container, or ice—the ice maker stops producing immediately. Other sudden failures include inlet valve failures where the valve never opens during harvest. If you recently had a power outage or freezer warm-up, the line can refreeze inside the fill route.
Can a bad water inlet valve cause no ice?
Yes. If the inlet valve can’t open for the ice maker circuit, water never reaches the mold, so no ice can form. This failure can be isolated to the ice maker branch, which is why the dispenser may still work normally. You can often detect valve issues by listening for the inlet valve “click” during an ice maker test cycle—if there’s no click or there’s no water at the mold, the inlet valve is a strong suspect. Clogs and partial electrical failures also prevent correct fill volume.
Should I replace the ice maker or the valve first?
Start with the water path. If there is no water at the mold during an ice maker test, check the supply line, thaw/clear any frozen tube, and confirm the inlet valve is opening and delivering water. Replace the ice maker only after you verify water is reaching it and the harvest cycle still fails. If water reaches the mold but ice won’t form or harvest won’t complete, the ice maker module/assembly is more likely. If the inlet valve never opens or delivers water, replacing the valve comes first.