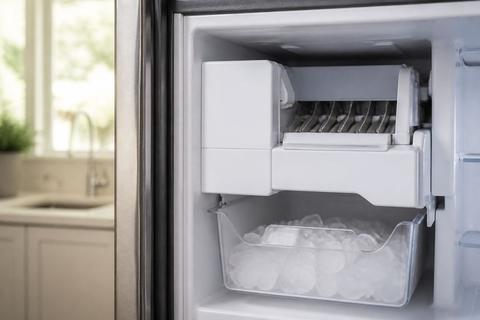
Samsung Ice Maker Assembly Replacement: Replace the Full Unit

If your Samsung freezer is cold but the ice maker won’t harvest, eject, or fill, you’re left guessing which part to replace. A samsung ice maker assembly replacement is the fastest path when the unit has electrical, mechanical, or repeated sensor/tray failures that keep coming back. This guide helps you recognize when a full module makes sense, choose the correct part number, and replace it safely with clean post-install testing.
For more help, see our Replace a Samsung Ice Maker: Removal and Installation Steps guide.
When a Full Ice Maker Assembly Makes Sense
If the ice maker’s problem isn’t isolated to a single damaged piece, replacing the full assembly saves time and prevents repeat breakdowns. Use the checks below to decide whether the module needs a complete swap rather than a small sensor or tray repair.
Signs the ice maker itself is failing
Start here: if the ice maker won’t complete the harvest cycle, the assembly is the likely root cause. Look for these symptoms:
- The ice maker does not cycle at all (no fill/harvest movement).
- It fills water but never ejects ice into the bucket.
- Ice production starts, then stops after a short run.
- The ice maker sounds like it’s trying to harvest (motor activity) but ice never drops.
If your Samsung shows an ice maker-related error (commonly a sensor/ice maker fault like 5E/SE), focus on whether the unit repeatedly fails after clearing frost or jamming ice.
When repair parts are not enough
Some failures involve multiple components inside the module—so replacing only one part doesn’t resolve the underlying issue. Choose full replacement when you’ve already tried basic fixes and the symptoms return, including:
- Replacing a tray or sensor but the motor/harvest still stalls.
- Clearing ice bridges and it freezes over again quickly.
- Replacing a disconnected or loose harness area but still seeing the same fault.
- The ice maker has visible physical damage (cracked auger, broken chute area, or melted/warped housing).
In these cases, the simplest reliable fix is replacing the complete ice maker assembly, not chasing internal wear.
How to tell a module issue from a sensor issue
Different symptoms point to different culprits. Use this practical split:
- Sensor issue pattern: ice maker faults (like 5E/SE) and/or repeated frost around the sensor area; harvest often fails until you defrost.
- Module/mechanics issue pattern: the unit appears to cycle but never ejects consistently; you can hear repeated attempts but ice drops are missing even after thawing.
- Clog-related overlap: if the chute or fill tube is blocked, sensors can report faults because harvest can’t complete.
If frost clogging clears yet the unit still won’t harvest/eject, treat it as a failing assembly rather than a one-off sensor event.
Identify the Correct Replacement Part
The fastest way to avoid repeat labor is matching the exact Samsung part for your model. Before buying, confirm the refrigerator model number and compare it to the ice maker assembly listing.
Match the model number before you buy
- Locate your refrigerator’s model number (usually inside the fresh food compartment door frame, behind the crisper area, or inside the unit wall).
- Write down the full alphanumeric model exactly—don’t use only the brand line or serial.
- Order the ice maker assembly that matches both your refrigerator model and the listed ice maker assembly part number.
This prevents a mismatch where the tray, harness plug, or mounting points are slightly different.
What to know about DA97-07549B and similar parts
DA97-07549B is a Samsung ice maker assembly part number used on specific refrigerator models. Even within Samsung’s line, “similar” ice makers can differ in tray shape, sensor location, or harness routing—so don’t treat part numbers as interchangeable.
- Use your refrigerator model number to confirm compatibility with the DA97-07549B listing.
- Compare the photo of the assembly to yours (especially the bucket connection, sensor position, and chute alignment).
- Verify the seller’s listing includes the correct refrigerator model match—not just “fits Samsung refrigerators.”
Check tray, sensor, and mounting differences
Before installing, visually compare key interfaces so you don’t get an assembly that won’t seat correctly:
- Tray/bucket interface: the bucket latch points and the chute opening must align.
- Sensor position: confirm the sensor location matches your existing unit (top/bottom placement and orientation).
- Mounting: bracket points should line up with your freezer wall; if they don’t, stop and re-check the part number.
- Harness plug: the connector shape and length should match without forcing or stretching wires.
Small differences can prevent the ice maker from cycling properly even if the unit fits loosely.
Tools, Safety, and Prep Before You Start
Replacing an ice maker assembly involves electrical disconnection and working around the freezer’s water-related components. Prep prevents leaks, short circuits, and dropped parts.
Shut off power and water safely
- Turn the refrigerator off using the control panel options (if your model has an Ice Off setting) or unplug the refrigerator.
- Shut off the water supply valve if your replacement requires disconnecting or working near the fill system line.
- If you must work behind the freezer cover, avoid pulling on the harness—disconnect the connector by gripping the plug, not the wires.
This step prevents both leaks and accidental activation while the ice maker is out.
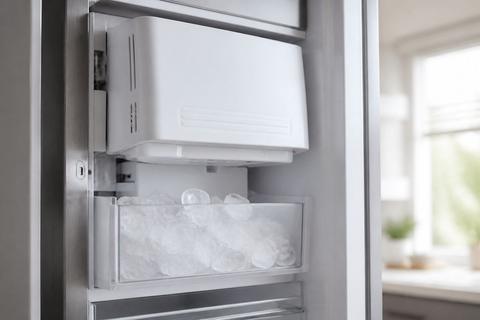
Empty the bin and clear access to the freezer
- Remove the ice bucket/bin and empty it completely into a sink or container.
- Break up any ice bridge by letting it soften with warm water (only where safe for plastics), then remove stuck ice with a soft tool.
- Clear space so you can pull the assembly forward without stressing the wiring harness.
If your freezer has frost buildup around the chute, address it before pulling the unit.
Gather the basic tools and a towel
Have the following ready so you don’t pause mid-job:
- A towel (to catch drips and protect surfaces).
- Screwdriver set (usually Phillips and/or Torx depending on model).
- A soft brush or cloth for removing loose frost/ice dust.
- Optional: a flashlight for wiring/harness visibility.
Keep small screws in a cup so you don’t lose them inside the freezer compartment.
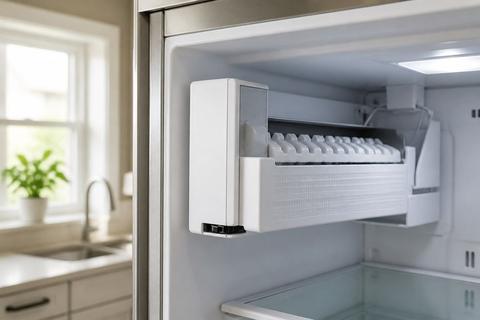
How to Replace the Ice Maker Assembly
Once you’ve got the correct part and safe access, the key is removing the assembly without damaging wiring and installing it with correct alignment and harness connection.
Remove the old assembly without damaging wiring
- Unplug or power down the refrigerator and shut off the water supply if required.
- Remove the ice bucket/bin if it’s not already out, then locate the ice maker assembly attachment points.
- Disconnect the ice maker harness by pressing/releasing the connector tab and pulling the plug straight out.
- Remove mounting screws/brackets and gently pull the assembly forward, supporting it so the harness doesn’t tug.
If you feel resistance, stop—there’s usually a hidden screw or bracket, or the harness is being caught.
Transfer any reusable covers or brackets
Before discarding the old unit, transfer components only if they are designed to move between assemblies:
- Check for reusable mounting brackets, clips, or insulation covers attached to the freezer wall or older module.
- Transfer them exactly as removed, keeping screw locations aligned.
- If your new assembly includes the same parts pre-installed, don’t double-stack brackets or covers.
Correct transfer ensures the new module seats firmly and prevents gaps that can trap frost.
Install the new unit and reconnect the harness
- Position the new assembly into the mounting area, aligning the chute with the freezer opening.
- Secure it with the correct screws/brackets—do not overtighten into plastic.
- Reconnect the harness plug until it clicks/locks.
- Reinstall the ice bucket/bin and close any covers you removed.
After installation, restore power and water (if you shut them off) using the same steps in reverse order.
Post-Installation Checks and Testing
After replacing the assembly, focus on cycling, water fill, and correct sensor behavior. One round of observation is enough to catch installation errors early.
Confirm the ice maker cycles correctly
- Power the refrigerator back on.
- Use the ice maker test mode if your model has one: on many Samsung models, press and hold the Test button on the underside/right side of the ice bucket area about 10 seconds until you hear a chime.
- Watch for a fill/harvest sequence—water should run, then the unit should attempt harvest/ejection.
If it never runs in test mode, re-check harness seating and power settings.
Verify the level sensor and fill tube
- Inspect the sensor area for correct placement; the sensor must face the same direction as the old unit.
- Check that the fill path/tube isn’t obstructed (no ice debris trapped near the sensor or chute).
- Ensure the assembly sits flush so the sensor reads correctly.
If frost was the cause of prior failures, clear it fully so the sensor can detect ice level accurately.
Look for leaks, noise, or error codes
During the first run:
- Check around the freezer wall and under the assembly for any drips or water trails.
- Listen for abnormal grinding or clicking that suggests misalignment.
- Monitor the display for any ice maker-related error codes (for example, 5E/SE faults tied to ice maker sensor issues).
If you see a leak, stop and correct the connection before continuing.
Common Mistakes That Cause Repeat Failures
Repeat failures usually come from mismatched parts, incomplete resets, or ignoring the real causes of “no ice” problems. Avoid these common traps.
Installing the wrong part number
Even one digit wrong can mean wrong harness routing or tray/chute geometry.
- Order strictly by matching your refrigerator model number to the correct ice maker assembly listing.
- Compare photos of tray, sensor placement, and mounting brackets to your old unit.
- Don’t reuse an old sensor if the new assembly includes a different sensor design.
If the assembly doesn’t seat exactly, stop—misfit parts create sensor misreads and harvest failure.
Forgetting to reset or power-cycle the refrigerator
After replacement, the control system may need a reset to begin a normal harvest cycle.
- Use the refrigerator controls to initiate ice maker operation (for example, switch Ice Off back to Ice On).
- Power-cycle the refrigerator if your model requires it after parts replacement.
- After restarting, discard the first one or two batches and allow up to about 24 hours for full production recovery.
Ignoring water supply or freezer temperature problems
No ice isn’t always an ice maker failure. Before blaming the new module:
- Ensure the freezer temperature is at 0°F (-18°C) or colder for proper ice formation.
- Check water pressure and supply: verify the water shutoff valve is open and the water line is connected without kinks.
- Confirm the fill tube path is clear—clogs can stop harvest even with a new assembly.
If water supply or temperature is wrong, the new ice maker still won’t produce reliable ice.
Repair vs. Replace: Which Option Is Smarter?
Deciding between a component repair and a full module replacement depends on whether the failure is confined or recurring. Use the criteria below to choose the most efficient option.
When a sensor or tray repair is enough
Pick a smaller repair when the symptoms point to a single component with minimal signs of broader mechanical/electrical failure:
- The unit works after a thaw but the problem returns only after ice buildup that affects the sensor or tray.
- The fault is clearly linked to one area (sensor readings, tray ejection, or a jam confined to the chute).
- The motor/harvest action is normal once the specific part is replaced.
If the module isn’t repeatedly failing after the related part is corrected, repairs can be the smarter spend.
When replacing the full assembly saves time
Choose a full ice maker assembly replacement when multiple issues appear or when partial repairs keep failing:
- The unit won’t cycle or won’t eject ice even after clearing frost/jams.
- Electrical behavior (no harvest response, repeated faults) persists after sensor/tray replacement.
- The assembly has visible mechanical damage or wear that affects ice handling.
In these cases, replacement reduces troubleshooting time and eliminates worn internal components that smaller repairs won’t fix.
How to judge cost against appliance age
Balance parts and labor against refrigerator longevity:
- If the fridge is fairly new and the cost of the full assembly is reasonable versus repeated service calls, replacement is often the best value.
- If the refrigerator is older and has other failing components (temperature control, water system, frequent diagnostics), prioritize the most reliable fix even if it costs more upfront.
- If you’ve already paid for multiple related repairs, compare the total cost to the price of a single full assembly and do the repair that ends the cycle.
A repeat-failure pattern is a clear indicator that replacement can be smarter than continuing to swap individual parts.
Frequently Asked Questions
How do I know if I need a full Samsung ice maker assembly replacement?
A full replacement is usually best when the ice maker will not cycle, won’t eject ice, has repeated sensor or tray issues, or has failed after other basic repairs. If the problem is limited to a single part and the rest of the module is sound, a smaller repair may be enough.
Can I replace only the ice maker sensor or tray?
Sometimes, yes. If the sensor, tray, or a small connected component is the only damaged part, replacing that piece can be more cost-effective. But if the unit has electrical or mechanical failure, replacing the complete assembly is often the safer fix.
What is DA97-07549B used for?
DA97-07549B is a Samsung ice maker assembly part number used on certain refrigerator models. Always confirm compatibility by matching your refrigerator model number and the exact part listing before ordering.
Do I need to turn off the water supply before replacing the ice maker?
Yes. Shut off power to the refrigerator and close the water supply if the replacement process requires disconnecting lines or working near the fill system. This helps prevent leaks and accidental activation.
Why does my new ice maker assembly still not make ice?
The issue may be with water pressure, a clogged fill tube, freezer temperature, wiring, or a control problem rather than the ice maker itself. Recheck installation, cycle the unit, and verify the refrigerator is cold enough for ice production.