How to Install a Samsung DA97-15217D Ice Maker Replacement

If your Samsung fridge’s ice maker stopped working or is producing weak, incomplete batches, you’re probably ready to swap the faulty assembly. For the samsung da97-15217d ice maker installation, the key is getting the right fit for your refrigerator model and seating the wiring and water path correctly before you restore power. Use these steps to remove the old unit, install the replacement assembly, and verify ice production safely.
For more help, see our Replace a Samsung Ice Maker: Removal and Installation Steps guide.
Before You Start: Compatibility, Safety, and Parts
Confirm the right replacement for your refrigerator model
Before you install the DA97-15217D, confirm it matches your exact Samsung refrigerator model. Look up your refrigerator’s model number from inside the fresh-food compartment wall or on the door frame sticker, then compare it to the part listing for DA97-15217D. Also check that the old ice maker assembly has the same mounting style, electrical connector type, and fill-tube orientation. If your refrigerator has a dual-ice or indoor/door ice configuration, verify DA97-15217D is the correct assembly for that specific ice location.
- Find the refrigerator model number sticker.
- Verify DA97-15217D is listed as compatible with that model and ice location.
- Confirm the connector type and mounting arrangement match the old unit.
Check the differences between DA97-15217D and related Samsung ice makers
Samsung makes multiple ice maker assemblies that look similar but differ in mold layout, sensor placement, harness length, and how the fill tube routes into the mold. Related part numbers may use different bracket spacing or a different connector keying, which can cause a “fits but won’t run” installation. Compare your old ice maker’s label and physical features to the DA97-15217D before you disconnect anything—especially the harvest mechanism shape, the sensor position, and the fill-tube connection point.
- Compare mold/harvest area shape and sensor location.
- Check bracket spacing and screw locations.
- Compare harness connector style and wire routing.
Gather basic tools and prepare a safe workspace
You need basic hand tools and enough space to work in the freezer without stressing the wiring harness or plastic covers. Clear frost on nearby surfaces only after power is off, and avoid pulling on the harness leads. Have a flashlight ready so you can see mounting screws and the fill-tube seat. If your unit has a water line in the freezer section, keep towels nearby to catch drips when the fill line is disturbed.
- Unplug the refrigerator or switch off power at the breaker.
- Gather Phillips/hex screwdrivers, a flashlight, and towels.
- Remove clutter so you can fully access the freezer interior safely.
Remove the Old Ice Maker Assembly
Shut off power and water before disassembly
Start by making the area safe. Powering down prevents electrical shock and avoids accidental cycling while the harness is disconnected. Shutting off water prevents spills inside the freezer and keeps water from refilling the fill line while you’re working.
- Switch off power at the fridge control (or unplug), then switch off water supply to the refrigerator.
- Remove the ice bucket if your model has one accessible from the freezer door or wall.
- Wait 5–10 minutes for any residual water pressure to settle.
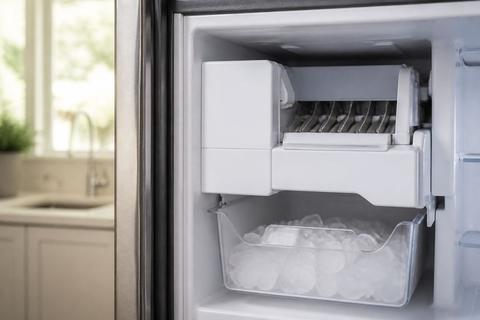
Access the freezer compartment and remove covers
Open the freezer and remove only the panels that block access to the ice maker assembly. On many Samsung models, you must remove a front cover or side guide to reach the mounting screws and wiring harness. Work slowly so plastic clips and tabs don’t snap.
- Open the freezer and locate the ice maker assembly housing and cover panels.
- Remove the freezer interior covers/guides that block the harness and screws.
- Set screws and small parts aside in a container so nothing is lost.
Disconnect the wiring harness and mounting screws
Once you see the harness connection and mounting fasteners, disconnect the electrical plug by gripping the connector body, not the wires. Then remove the ice maker mounting screws that secure the assembly to the freezer wall or bracket.
- Unplug the wiring harness connector from the ice maker.
- Remove the mounting screws holding the ice maker in place.
- Support the unit with your other hand as the last screw comes out to prevent strain.
Inspect the old unit, fill tube, and mounting points
Before you install the replacement, inspect what caused the failure and check for damage or blockage. Look at the fill tube connection, the water path area, and the mounting points on the freezer housing. If you see ice bridges, heavy frost, or a cracked fill-tube seat, address it now so the new DA97-15217D can cycle normally.
- Check the fill tube for looseness, cracks, or ice blockage.
- Inspect mounting points for cracks or stripped screw holes.
- Look for frost buildup around the sensor or harvest area.
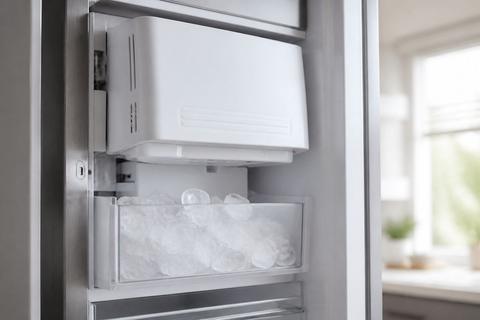
Install the New Ice Maker Correctly
Position the new ice maker assembly in place
Set the DA97-15217D into the same mounting position as the old unit. Align it with the screw holes and ensure the harness routes without pinching. If the assembly doesn’t sit flat, stop and re-check bracket alignment—forcing it can misalign the fill tube and harvest mechanism.
- Place the ice maker assembly onto the freezer mounting brackets.
- Align screw holes so the unit sits flush without gaps.
- Keep the harness wire route clear of sharp edges and moving parts.
Reconnect the wiring and secure the brackets
Reconnect the harness fully so the connector seats without looseness. Then reinstall all mounting screws to keep the ice maker stable during harvest and fill cycles. A partially seated connector is a common cause of “no ice” after installation.
- Plug the wiring harness connector into the ice maker until it clicks/fully seats.
- Reinstall all mounting screws and tighten securely.
- Verify the harness has slack where required and isn’t stretched.
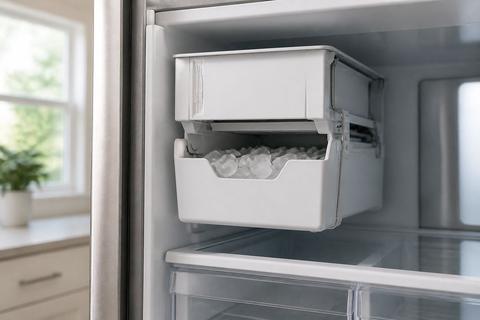
Reattach covers, guides, and any alignment tabs
Reinstall the covers and guides you removed so the ice maker has the correct clearance for the ice bucket and chute. Alignment tabs and guides help keep the ice path positioned correctly. If a cover or guide sits crooked, it can interfere with the bucket or obstruct ice fall.
- Reinstall covers/guides in the original positions.
- Ensure alignment tabs snap into place where applicable.
- Make sure the ice chute path is unobstructed.
Verify the fill tube and water path are seated properly
The DA97-15217D depends on the fill tube being seated correctly into the water path and mold area. If the fill tube is not fully engaged, water won’t reach the mold properly and the unit won’t produce full batches. After installation, confirm the tube connection looks aligned and fully seated with no gaps.
- Seat the fill tube so it sits fully in its connection point.
- Confirm there are no kinks in the line near the freezer housing.
- Check the water path area for clear passage into the mold zone.
Restore Power and Test the Ice Maker
Turn the water and power back on
Restore water supply first, then power. This ensures the ice maker’s initial fill attempts have water available and avoids unnecessary dry cycling. Keep an eye on connections for early drips while the water re-pressurizes.
- Turn the refrigerator water shutoff valve back on.
- Restore power to the refrigerator (plug in or switch breaker back on).
- Wait for the freezer control to stabilize before running tests.
Run a test cycle and listen for normal operation
Many Samsung models provide an ice maker test mode. On many French-door Samsung refrigerators, there is a small blue Test button on the underside or right side of the ice bucket assembly—press and hold it about 10 seconds until you hear a chime. The unit should run through a cycle with a fill/harvest behavior you can hear.
- Locate the ice maker test button (commonly a small blue Test button near the ice bucket area).
- Press and hold for about 10 seconds until you hear a chime.
- Listen for motor-driven harvest movement and water fill sounds.
Check for leaks, abnormal noise, or error symptoms
During the first cycle, inspect around the water connection points and the freezer housing area where the ice maker mounts. Leaks or loud grinding indicate misalignment, a pinched harness, or a poorly seated water path. If the display shows an error code related to the ice maker (commonly 5E or SE on many Samsung models), stop the process and address frost, sensor, or harvest issues.
- Look for moisture around the fill-tube connection and mounting area.
- Watch for rattling or grinding during harvest.
- Note any ice maker error code such as 5E or SE.
Allow time for the first ice production cycle
Ice makers usually need time for the freezer and mold to complete the full cycle and produce the first batch. Plan for several hours up to a full day depending on freezer temperature and water conditions. The first one or two batches should be discarded after installation to flush the line and clear any residual water.
- Expect the first ice batch to appear within several hours to 24 hours.
- Discard the first one or two batches for best taste and cleanliness.
- Confirm the freezer is at 0°F (-18°C) for proper ice formation.
Troubleshooting Common Installation Problems
Fix a unit that does not cycle or harvest
If your DA97-15217D doesn’t cycle or harvest after installation, check the most common causes: harness seating, a blocked harvest path, or a sensor/defrost issue. Frost can prevent the sensor or harvest mechanism from finishing its cycle. Start with a power reset and then run the test cycle again after addressing ice buildup.
- Power off the refrigerator, then power back on after 5–10 minutes.
- Reseat the wiring harness connector—push until fully seated.
- Remove any ice bridge/jam in the harvest area using warm water and a towel to catch runoff.
Solve water fill, freezing, or overfilling issues
Water problems are commonly related to the fill tube seating, a frozen water line, or incorrect temperature. If no water reaches the mold, inspect the fill tube connection and ensure there are no kinks. If you get slow freezing or overflow, verify correct freezer temperature and check for abnormal frost buildup that blocks proper fill/harvest timing.
- Ensure the fill tube is fully seated with no gaps at the connection point.
- If the water line is frozen, thaw gently and keep the freezer door closed to restore temperature.
- Verify freezer temperature is 0°F (-18°C) to stabilize freezing time.
Address fitment issues with related Samsung ice maker variants
If the unit doesn’t sit flush, the harness or brackets strain, or the ice chute alignment seems off, you may be dealing with a closely related variant instead of the correct DA97-15217D. Fitment problems usually show up as uneven mounting, incorrect chute position, or a fill tube that won’t connect properly. Compare your install to the old unit’s bracket/screw placement and fill-tube orientation.
- Remove the unit and compare bracket positions to the original ice maker.
- Re-check that you used the exact DA97-15217D assembly for your refrigerator model.
- Ensure covers/guides snap in correctly so the ice bucket and chute align.
Know when the problem is the water valve, sensor, or control board
When installation is correct but the unit still fails, isolate the likely failing component. A sensor fault often presents with an ice maker-related code (commonly 5E or SE) and flashing ice-maker light on many models. If a frozen-up component is clearing slowly, run a forced defrost to remove frost buildup. If water never arrives after thawing and reseating, the water valve may be at fault. If power/wiring is correct and water still doesn’t flow reliably, the control board may be failing.
- If you see 5E/SE or ice maker light flashing, run a full defrost (see forced defrost below).
- If water never reaches the mold after thaw and proper fill-tube seating, suspect the water valve.
- If water flow and sensor conditions look correct but cycles still fail, suspect the control board.
To clear a frost-clogged condition without unplugging, run Forced Defrost on many models by pressing and holding the Freezer (or Power Freeze) and Fridge (or Lighting) buttons together for about 8–12 seconds until the panel goes blank and beeps. Then press a button repeatedly until the display reads “Fd” to start the defrost cycle.
When to Replace vs Repair Other Samsung Ice Maker Parts
Understand when a full replacement is the better choice
A full assembly replacement is the best move when the failure is internal to the ice maker—like the mold assembly, harvest mechanism, or built-in sensor—because these parts are difficult to test and access accurately. With the DA97-15217D, you’re replacing the complete module so the wiring, motor/harvest components, and sensor behavior align as designed. If you’ve already discovered the fill tube, harness, and mounting were disturbed due to an internal failure, a full replacement prevents repeat downtime.
- Replace the full assembly when the motor/harvest mechanism or sensor fails internally.
- Choose full replacement when the mold mechanism is cracked or iced up permanently.
- Avoid piecemeal repairs when the unit requires repeated disassembly to access the internal parts.
Compare common Samsung ice maker assembly variants
Samsung ice maker assemblies can differ in how the harness connects, which sensors they use, and how the harvest cycle is timed. Some variants are designed for different refrigerator generations or different ice locations within the same cabinet. If your symptoms started after a previous part swap, compare the old and new assemblies for harness connector matching and fill-tube seat geometry. A mismatched variant can appear physically similar but fail to cycle properly.
- Confirm harness connector keying and harness length match your old unit.
- Compare sensor placement and how the assembly mounts to the same surface.
- Check that the fill tube routes into the same mold location.
Evaluate dual ice maker and indoor ice maker setups
Dual ice maker setups and indoor ice systems often involve multiple components feeding ice production, so one failing section can look like a broader ice problem. If your system includes a separate indoor ice mechanism, verify the correct DA97-15217D is the one tied to the ice that isn’t producing. If only one ice channel fails, isolate that channel’s components first rather than replacing everything blindly.
- Identify which ice output is failing: standard/freezer ice vs indoor/other ice source.
- Verify the correct assembly is installed for that specific location and intake path.
- Confirm water supply to the failing ice system before concluding the ice maker assembly is bad.
Frequently Asked Questions
Is the DA97-15217D ice maker compatible with other Samsung part numbers?
Sometimes, but only if your refrigerator model matches and the connector layout and mounting method are the same. Always verify compatibility using the refrigerator’s model number and a direct part cross-reference for the DA97-15217D against the exact ice maker assembly you’re replacing. If your old unit has a different sensor location, harness connector style, or mounting bracket spacing, treat it as incompatible even if it looks similar.
Do I need to shut off the water before replacing the ice maker?
Yes. Shut off both power and water before you remove the ice maker assembly. This prevents leaks inside the freezer, avoids electrical risk when disconnecting the wiring harness, and stops the ice maker from attempting to cycle while parts are disconnected and covers are removed.
Why is my new Samsung ice maker not making ice after installation?
The most common causes are a loose or incorrectly seated wiring harness, an unseated fill tube/water path, a frozen water line, or a unit that needs an initial cycle time after installation. If the freezer is not at the required temperature (0°F / -18°C), the mold may not freeze ice consistently. If you see an ice maker-related fault code like 5E or SE, frost or a sensor/harvest issue is the likely culprit.
How long does it take for a Samsung replacement ice maker to start producing ice?
It can take several hours up to a full day for ice to appear after replacement. The exact timing depends on your freezer temperature, water supply conditions, and the ice maker’s fill/harvest cycle timing. After installing a new unit, discard the first one or two batches once ice production begins.
Should I replace the whole ice maker assembly or just one part?
If the mold, motor/harvest mechanism, sensor, or internal internal linkage has failed, replacing the full ice maker assembly is more reliable than trying to repair or swap a single internal component. The complete module ensures correct alignment, sensor behavior, and mechanical timing—reducing repeat failures caused by partially repaired internal faults.