Samsung French Door Defrost: When You Can’t Remove the Ice Maker

If your samsung french door defrost cant remove ice maker situation has you staring at a solid block of ice, you’re not alone—frost and jammed components can lock the assembly in place. The key is to defrost safely first, then address the exact release points so you don’t crack the housing or damage wiring. Below are the safest methods and the checks that stop the ice from returning.
For more help, see our Samsung Ice Maker Frozen: Defrost, Reset, and Stop Freeze-Ups guide.
Why the Ice Maker Gets Stuck
Common frost buildup and alignment issues
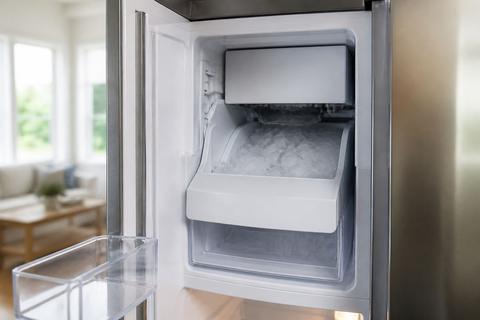
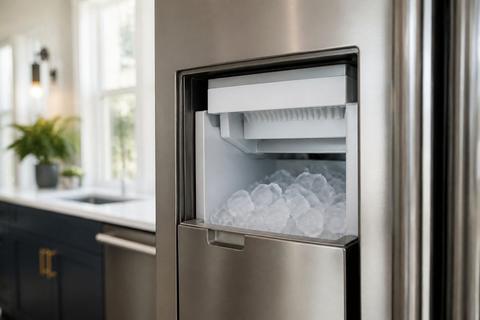
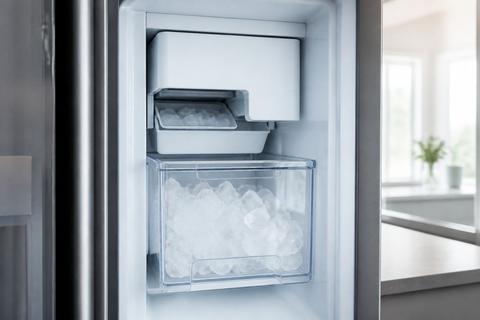
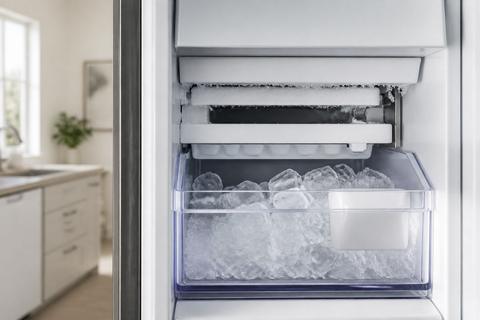
Ice makers in Samsung French door fridges can “lock” due to frost that forms at the auger, chute, and around the ice bucket opening. When the ice maker isn’t aligned correctly—or the cover/bin sits slightly crooked—meltwater doesn’t drain cleanly and refreezes into a tight ice bridge. This is especially common after a period of heavy frost, frequent door openings, or a freezer that runs warm enough for partial melting and then refreezing.
- Inspect the ice bucket rim and chute opening for a continuous ice seam.
- Look for uneven gaps where the ice maker cover meets the housing.
- Check whether the ice bucket seats fully when you push it back in (a misalignment can trap ice).
Signs the ice maker is frozen in place
You’ll usually notice the ice maker won’t release even after you remove the ice bucket, and the auger/chute area feels “solid” rather than just lightly frosted. Common indicators include a hard ice ring around the chute, the ice maker light staying on while it never harvests, or an ice bucket that appears movable but won’t fully clear the stuck ice bridge behind it. If the unit is mid-cycle, the module can also be held by ice formed during the harvest phase.
- Try removing the ice bucket; if it doesn’t slide out cleanly, frost is holding it.
- Feel around the chute area (carefully) for a hardened ice plug.
- Note any error behavior on the display (see service section later).
When the problem is a jam versus a true defrost issue
A jam means the mechanism is physically blocked—commonly by a large clump of ice or misdirected ice that bridges the chute. A true defrost issue means frost formation is ongoing because water can’t drain (clogged drain, restricted airflow, or sealing/temperature problems). You can tell the difference: if defrosting clears the chute and the maker resumes normal cycles, it was a jam; if the frost returns quickly, the underlying cause is drainage/airflow/temperature.
- If ice remains after a controlled defrost, treat it as a jam point.
- If ice returns within a short time window, treat it as a drainage or airflow failure.
- Avoid forcing removal in either case—first clear the ice safely.
Safe Ways to Defrost the Ice Maker Area
Power down and protect the freezer contents
Start by stopping the freeze cycle so the area doesn’t keep building frost while you work. On many Samsung models, you can turn off the ice production via the panel (look for Ice Off), then remove only nearby items you need to access the area safely. If you can’t reach the ice maker area without pulling too much, power down the freezer section only and keep the rest of the food protected with an insulated blanket.
- Switch Ice Off on the control panel (or turn off the freezer/ice maker section).
- Remove the ice bucket and any loose items that could block your access.
- Keep the door closed as much as possible to slow melting/refreezing cycles.
Use gentle, controlled heat to loosen ice
Use controlled warmth so plastic parts and any wiring insulation don’t get stressed. The best approach is gradual melting: warm air or a warm damp cloth directly on the ice boundaries. A hair dryer on low set to a distance prevents thermal shock—especially where plastic housings meet the ice chute. Work in short intervals and keep heat moving rather than concentrating on one spot.
- Set a hair dryer to low and hold it 4–8 inches away from the ice (move constantly).
- Alternatively, apply a warm, damp cloth to the ice seams for 5–10 minutes at a time.
- Use a wooden/plastic utensil only to guide meltwater away—don’t pry against the housing.
Speed up melting without damaging plastic parts
To speed things up safely, focus on channels where heat will break the ice bridge while protecting plastic. Place a towel along the bottom to catch meltwater, and keep the ice maker area dry-ish so water doesn’t refreeze elsewhere. If your fridge has an ice chute cover, aim heat at the edges of the cover seam rather than blasting the center.
- Lay a towel under the chute area to catch drips.
- Heat the edges first, then move inward after the seam loosens.
- Stop when the ice begins to loosen—forcing it can re-freeze if the area stays cold.
What to avoid: knives, boiling water, and forced prying
Avoid methods that crack plastic, damage sensors, or short wiring. Don’t use knives, metal scrapers, or sharp tools to “cut” ice—the ice maker housing and chute components are plastic and can fracture. Don’t pour boiling water into the unit; thermal shock and water intrusion can warp parts or reach electrical connections. Most importantly: do not force the module out if it doesn’t release after safe thaw.
- Never insert knives or metal tools into gaps around the chute.
- Never use boiling water or high-heat sprays directly on plastic.
- Do not pry the ice maker housing; released tabs and screws should be found first.
How to Remove the Ice Maker When It Will Not Release
Check for hidden screws, tabs, or locking clips
If defrosting loosens the ice but the ice maker still won’t come out, you’re likely dealing with a mechanical lock point. Many Samsung assemblies use a mix of tabs, screws, and sometimes a locking clip near the back edge or underside of the module. Look closely for fasteners you can access once frost is removed—especially around the corners of the housing and at the mounting flange.
- Remove the ice bucket again and shine a flashlight into the ice maker cavity.
- Look for screw heads, wire harness clips, or latch points near the sides and underside.
- Search for a tab that prevents the module from sliding straight out.
Release the assembly without cracking the housing
Removal should be straight and controlled, not twisted. Once any ice bridge is melted and the fasteners are identified, release tabs with gentle finger pressure or a proper plastic pry tool only where the design calls for it. If you feel resistance before reaching the fully seated position, stop—recheck hidden clips or screws instead of bending the housing.
- Unseat the module by loosening one side/tab at a time.
- Pull the assembly straight out, then stop if it catches at the harness area.
- If you see a harness or connector, release it properly before fully removing the unit.
What to do if the drawer or cover blocks access
Some Samsung French door models restrict access to the ice maker mounting area with a drawer, cover panel, or side housing. If a cover blocks screws, you must remove that cover first—don’t force the ice maker past it. Clear meltwater first, then remove the blocking panel using the accessible fasteners and clips you can see after defrost.
- Defrost the area enough that the cover moves freely.
- Remove the blocking drawer/cover by releasing its visible screws or latch points.
- Re-check for mounting screws on the ice maker once the cavity is fully exposed.
After the Ice Clears: Inspect the Root Cause
Look for a clogged drain or airflow problem
Once the ice maker area is thawed, the next job is stopping repeat frosting. A clogged drain prevents meltwater from exiting, so it refreezes into the same ice bridge that trapped the module. Airflow problems can also keep the chute area too cold and damp, leading to recurring frost accumulation. Check for standing water, debris, or an iced-over drain area behind the back panel if accessible.
- Look for signs of standing water around the drain path.
- Ensure vents inside the freezer aren’t blocked by tall items or ice buildup.
- If you see repeated frost patterns in the same location, treat drainage/airflow as the primary suspect.
Check the water line, fill tube, and inlet valve
Recurring ice clumps can start with inconsistent water fill. A kinked water line, restricted supply, or a failing inlet valve can cause uneven fill that freezes into stubborn masses. Inspect the water line for kinks or weak connections, and check the fill tube path for obstruction or ice restriction near the inlet.
- Inspect the water line routing for kinks, pinches, or loose fittings.
- Check for ice blockage around the fill path and any accessible inlet area.
- If you detect irregular ice output, verify the water supply is steady before re-running tests.
Inspect the freezer door seal and temperature settings
A freezer that runs warm or fluctuates will produce cycles of melting and refreezing, feeding frost growth around the ice maker chute. Door seal issues let humid air in, which then freezes inside. Confirm the freezer temperature is correct and that the gasket closes evenly without gaps.
- Set the freezer to 0°F (-18°C) and let it stabilize.
- Check the door gasket for cracks, warping, or gaps by closing a dollar bill and gently pulling—notice resistance consistency.
- Make sure the ice maker area isn’t blocked by items that interfere with airflow.
Prevent the Frost From Coming Back
Set the freezer to the right temperature
Proper temperature control is the foundation for preventing frost recurrence. Set the freezer to 0°F (-18°C) so moisture doesn’t partially melt and re-freeze on the chute and auger areas. After changing settings or after a defrost, allow time for internal temperatures to stabilize before judging ice output.
- Keep freezer temperature at 0°F (-18°C) for consistent ice formation.
- Avoid frequent setting changes during the first 24 hours after thawing.
- Maintain a stable routine: fewer long door-open periods means less humidity buildup.
Keep vents open and avoid overpacking
Restricted airflow keeps certain zones damp and colder than needed, which accelerates frost at the ice maker interface. Don’t block freezer vents with large containers, and avoid overpacking that prevents cold air circulation. Arrange food so air can move around shelves, especially near the back wall where circulation typically happens.
- Leave clearance around vents on the back/side walls.
- Avoid stacking items tightly against the ice maker area.
- Use shallow bins rather than large blocks that stop airflow.
Replace worn seals or damaged ice maker parts
If the freezer door seal is worn or the ice maker assembly has cracks, you’ll keep fighting frost. Damaged components can create new leak paths or trap meltwater where it shouldn’t. Replace the door gasket if it doesn’t seal evenly, and if the ice maker mechanism is defective, replacing the correct module prevents repeated harvest failures and jam conditions.
- Replace a door gasket that doesn’t seal uniformly.
- If the ice maker housing or chute cover is cracked, repair/replace the affected part.
- Use model-correct replacement components so mounting and seals fit properly.
When to Reset, Repair, or Call for Service
When a simple reset may help
A reset can clear a stuck control state after a jam or after power interruption during defrost. On many Samsung refrigerators, you can reset by using the Ice Off option on the panel, then restoring the ice maker function after the area is fully thawed. If your display includes ice maker indicators, pay attention to changes after reset; also remember it can take time for fresh ice production to restart.
- Switch Ice Off on the panel.
- After the ice clears, switch ice production back on.
- Wait up to 24 hours for the first new batch to complete—discard the first one or two batches.
When the ice maker module likely needs replacement
If the ice maker still won’t harvest after a full defrost, and you’ve confirmed there’s no frost block, the module may be failing mechanically or electrically. Symptoms include persistent ice maker errors, continued inability to release/rotate the auger, or no water fill despite correct temperatures and water supply. A sensor fault or repeated harvest failure after thaw indicates replacement is more likely than additional defrosting.
- If the chute clears but ice output remains absent, the module may be faulty.
- If you get repeated ice maker faults after thaw and reset, replacement is likely.
- If you notice damaged wiring/harness connections or broken mounts, service is required.
When professional service is the safest option
Call for service when you see signs of wiring damage, water intrusion beyond the ice maker cavity, repeated electrical faults, or you can’t identify fasteners without forcing parts. Also contact Samsung-authorized service if the refrigerator trips breakers, if a display shows persistent ice maker sensor faults, or if there’s heavy ice build across multiple components that suggests a larger defrost/drain system issue.
- If you find water near electrical connections, stop and call service.
- If an ice maker sensor error (such as 5E/SE) persists after defrost and power reset, request diagnosis.
- If the assembly won’t release with visible fasteners after thawing, avoid prying and let a technician remove it correctly.
Frequently Asked Questions
Why can’t I remove the ice maker from my Samsung French door fridge?
Most often, the ice maker is frozen in place by frost, blocked by a hidden clip or screw, or partially jammed by a misaligned cover or bin. Defrosting the area and checking the release points usually solves it.
What is the safest way to defrost a Samsung ice maker?
Turn off the fridge or freezer section, empty nearby items, and use gentle warm air or a warm cloth to melt the ice gradually. Avoid sharp tools and high heat that can crack plastic or damage wiring.
Should I force the ice maker out if it will not budge?
No. Forcing it can break the mounting tabs, damage the housing, or tear wiring. If it does not release after defrosting and checking for fasteners, it is safer to inspect the model-specific removal method or call service.
Why does the ice maker keep freezing up again after defrosting?
Recurring frost usually points to an underlying issue such as a clogged drain, poor door seal, incorrect temperature, restricted airflow, or a water fill problem that lets moisture refreeze.