GE Ice Maker Resets, Lights, and Error Codes Explained
If your GE ice maker stopped making ice—or the lights are blinking and confusing you—GE Ice Maker Resets, Lights, and Error Codes is exactly what you need to get unstuck fast. The reset method, light meaning, and fault details depend on your GE model family, but the diagnostic path is consistent. Start with the indicator you’re seeing, then move to temperature and water supply checks before assuming the ice maker is “bad.”
How to Reset a GE Refrigerator Ice Maker: Model-Specific Steps
Resetting a GE refrigerator ice maker depends on the exact control layout, so match the procedure to your unit. A reset can clear a temporary control or harvest interruption, but it won’t fix no-water, frozen lines, or a stuck ice mold that prevents ice from completing a cycle. Use this path to get the unit back into a known state, then address any underlying water/temperature problems that still block ice production.
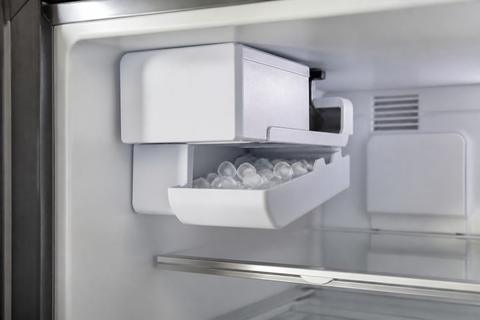
GE refrigerator ice maker reset (standard wire-bail feeler + harvest behavior)
- Locate the ice maker’s feeler arm (wire bail) inside the ice compartment.
- Raise the feeler arm fully to the stop for 10 seconds, then lower it back down.
- Wait for the ice maker to complete a harvest cycle (you should hear the motor start and water flow in sequence).
- Confirm the freezer temperature is set cold enough for ice making: aim for 0 to 5°F in the freezer.
GE ice maker reset with a front power switch or reset/test button (modular-style)
- Open the ice maker cover inside the freezer (if present).
- Find the small power switch on the ice maker and slide it to ON.
- If your unit includes a recessed test button next to the status LED, press and hold it for the manufacturer-designated moment (commonly 3–5 seconds) to start a manual harvest.
- Allow the unit a full harvest cycle to resume production.
GE Profile / modular patterns: when a reset is needed and when it isn’t
- If the ice maker has power but the light indicates a stalled status, perform the model-appropriate reset (feeler arm cycle or ice maker power switch/test button).
- If the freezer temperature is above 10°F, ice maker control stays inhibited—lower the freezer setting first.
- If ice is present but new ice stops, inspect for a mechanical stop (ice jam in the mold) before repeatedly resetting.
Full Guide: How to Reset a GE Refrigerator Ice Maker: Model-Specific Steps
Green Light Flashing on GE Ice Maker: Quick Reset and Fixes
A flashing green light means the ice maker is actively communicating a status—often a normal indication, an in-progress harvest, or a condition that requires a quick reset. Your goal is to separate “the unit is doing something” from “the unit can’t proceed because water flow or a component check is failing.” Use the steps below to perform a safe reset and then move to temperature and water checks if the blinking persists.
What the flashing green light usually indicates
- Treat a flashing green LED as a status/operation signal, not a universal error code.
- Watch whether the light changes during harvest (motor start and water fill).
- If blinking continues after harvest should have completed, proceed to a reset and then water/temperature checks.
Quick reset for a flashing green status light
- Raise the ice maker feeler arm to the stop for 10 seconds, then lower it.
- If your ice maker has an ON/OFF switch, slide it to OFF, wait 30 seconds, then back to ON.
- If your unit has a recessed test button next to the LED, press it to trigger a manual harvest cycle.
- Recheck the freezer setting to 0–5°F.
When to stop resetting and troubleshoot the cause
- If the freezer is too warm, the ice maker will not cycle reliably—lower the freezer to 0–5°F.
- If there’s little or no water sound during harvest, go directly to water supply and filtration checks rather than more resets.
- If ice builds up or the mold area is packed with ice, clear the jam so the mold can harvest and release.
Full Guide: Green Light Flashing on GE Ice Maker: Quick Reset and Fixes
GE Profile Ice Maker Blinking Yellow or Blue: Reset and Fix
On GE Profile ice makers, blinking yellow or blue lights typically point to a status change, a communication issue, or a component fault state rather than a single universal “reset problem.” Light color matters: it tells you which troubleshooting lane to follow and whether the control expects a clean, calibrated state. Use the model path below to interpret the blink and reset in the right order—then resolve any water/temperature blockers.
Blinking yellow/blue: how to interpret the light pattern
- Identify the exact color (yellow vs. blue) and whether it is blinking or steady.
- Pair the light with behavior: if the ice maker is not filling, focus on water flow; if it fills but doesn’t harvest, focus on mechanical/ice mold release.
- Use the model-specific behavior guide for your Profile control board layout so you don’t chase the wrong component.
Reset steps for GE Profile ice makers with status blinks
- If the unit has a feeler arm, cycle it: raise to the stop for 10 seconds, then lower.
- If the unit has an ice maker power switch, turn OFF for 30 seconds, then back ON.
- If there is a test/reset button on the ice maker module, press it to start a manual harvest cycle.
- Ensure the freezer temperature is 0–5°F and the unit has a steady water supply.
If the light returns after reset
- If the blink resumes immediately, the issue is not temporary—move to the Profile model-specific troubleshooting flow.
- If ice production never starts, check water flow (filter condition, line freeze, or kinked line) before pursuing sensor replacements.
- If ice production starts but stops mid-cycle, focus on harvest completion and mechanical obstruction (ice jam in mold/bin).
Full Guide: GE Profile Ice Maker Blinking Yellow or Blue: Reset and Fix
GE Ice Machine Error Codes: Decode and Fix Common Faults
Error codes tell you which subsystem the control is complaining about—water flow, temperatures, sensor readings, or control board communication. The fastest repair is to identify the exact code and follow the proper code-specific correction rather than trying random resets. Use this section to decode the code correctly and then jump to the full error-code list so you don’t repeat every fault description here.
Why reading the code matters
- A reset only clears temporary conditions; persistent codes mean a specific fault is still present.
- Many ice maker problems look identical (no ice), but codes isolate whether the cause is water delivery, freezing performance, or sensor/board logic.
- The same symptom can have multiple different codes across GE ice maker families.
How to locate and record the code
- Look for the code on the ice maker module display (if present) or in the refrigerator/ice maker indicator area.
- Write down the full code exactly as shown, including any letter prefix and number sequence.
- Note whether the code appears immediately or after a reset attempt.
Common categories of fixes you’ll see in the code list
- Water-side faults: address water filter restrictions, inlet water temperature, and any freeze/kink in the water line.
- Temperature faults: set freezer temperature to 0–5°F and ensure vents are not blocked.
- Sensor/control faults: inspect wiring/connector seating and follow the code-specific component diagnosis path.
Avoid repeating resets instead of solving the root cause
- If the same code returns after a brief reset, proceed using the code-specific steps.
- Don’t keep power-cycling repeatedly; persistent codes indicate a real condition the ice maker can’t clear on its own.
- Focus on correcting the specific category shown by the code: water, temperature, sensor, or harvest mechanics.
Full Guide: GE Ice Machine Error Codes: Decode and Fix Common Faults
GE Profile Ice Maker XPIO13SCBSS: Parts, Codes, and Fixes
The GE Profile XPIO13SCBSS ice maker has distinct control behavior, indicator patterns, and common failure points that don’t always match other GE models. The best way to repair it is to use the model’s parts layout and its code-driven troubleshooting logic so you replace or repair the correct subsystem first. This section helps you orient to the right diagnostic angles—parts, codes, and repeated real-world issues—without duplicating the dedicated model repair guide.
Parts and diagnostic angles that matter for XPIO13SCBSS
- Start with water delivery components: inlet path, water valve operation, and any known restriction points that affect fill.
- Next focus on sensor/control elements tied to harvest and readiness (because light/blink states usually reflect those readings).
- Check the ice delivery and mold release path for ice buildup that prevents harvest completion.
Using XPIO13SCBSS codes to target the correct subsystem
- Treat the code as your decision tree—water-related codes lead to filter/line/valve checks, while sensor codes lead to sensor and wiring checks.
- Record the exact code and any displayed sequence timing (code appears immediately vs. after a cycle begins).
- Follow the code-specific correction order: address the easiest cause first (water flow/temperature) before replacing components.
Most common XPIO13SCBSS failure patterns to address early
- No ice + no obvious fill: inspect the household water filter and ensure the water line isn’t frozen or kinked.
- Ice maker runs but stops: check for mechanical obstruction (ice jam) and verify freezer temperature is stable at 0–5°F.
- Repeating status blinks: clear temporary states with a model-correct reset, then pursue the code-specific fault until it stops returning.
Full Guide: GE Profile Ice Maker XPIO13SCBSS: Parts, Codes, and Fixes
Frequently Asked Questions
What should I check first when a GE ice maker stops working?
Start with the ice maker’s indicator light, because blinking patterns tell you whether the unit is waiting, harvesting, or faulting. Next check freezer temperature (set it to 0–5°F) and confirm there is water supply to the ice maker—no ice occurs if inlet water flow is restricted or frozen. Then check whether the unit recently needed a reset and whether the reset actually triggers a harvest cycle (motor + water fill). If the basics look normal and the light/code returns, move to the model-specific troubleshooting path or error-code diagnosis.
Do GE ice maker light colors mean the same thing on every model?
No. Light color and blink patterns vary by GE model family and even by the ice maker module design. A flashing green LED on one unit may be a status/harvest signal, while a blinking yellow or blue light on a Profile unit points to a different state or fault category. The correct approach is to interpret the light together with your model family and the presence of error codes, then follow the matching model procedure.
Can resetting a GE ice maker fix error codes?
Sometimes, but not always. A reset can clear a temporary control interruption, which may also clear a transient status. If an error code returns or the light keeps blinking after the reset, the underlying cause remains—usually water flow restriction, improper temperature, frozen/kinked lines, or a sensor/ice-making component fault. In that case, solve the underlying issue indicated by the code rather than repeating resets.